Online conference volunteers
An online conference presents a different set of challenges from a conference held in person. DebConf uses the following setup when running an online conference. The largest difficulty is getting things setup. This requires a fairly involved process of getting the required services up and running. While explaining how to set it up is beyond the scope of the guide, the Ansible roles and playbooks required are found in The DebConf video team Ansible Documentation. The general setup is described under Room setup.
Points of contact
Orga:
#debconf-teamVideo:
#debconf-videoContent:
#debconf-contentWebsite:
#debconf-team
Operating volunteer setup/requirements
8mbps dedicated Internet connection. Jitsi and stream monitoring take the most bandwidth, so if you are struggling, try monitor a lower quality version of the stream or lower the quality in your Jitsi client.
Headphones (if not, use push-to-talk by pressing the space bar, to avoid echo)
Microphone (for Talkmeister: external ideal)
Software installed:
Internet browser - Chrome, Chromium or Firefox. Firefox ESR may cause local performance issues for people using it.
VLC - monitor the stream
IRC client - hexchat, weechat, Quassel. Matrix is good for people who aren’t familiar with IRC.
Credentials / accounts required:
IRC
Jitsi streaming keys (for streaming to Vogol)
Salsa
Conference Website - ask on
#debconf-teamfor access to the video team group
Useful links/URLs (these are conference specific, available in the wiki):
Jitsi
Streaming endpoints/stream website
Q&A pads
Schedule
Vogol
Conference website
SReview
Running a talk (Director)
The Director controls what is recorded and what goes out onto the stream. They decide what video sources should be shown on stream and are in charge of the pre-recorded video playback, when applicable. They are also responsible for monitoring the stream for quality assurance.
Go to the Vogol instance for the conference and log in with Salsa SSO. A larger DebConf will have one Vogol instance for each room. You will be prompted to authorize the application and will be redirected back to Vogol when you do.
Vogol is a web frontend to Voctomix, the same system we use for in-person DebConfs. All changes you make there will be visible on the stream. The previews are images updated once a second, so they will look quite jumpy. The Mixed Output section shows what is is going out on stream if the stream output is live.
Controls
The Vogol UI has one screen:
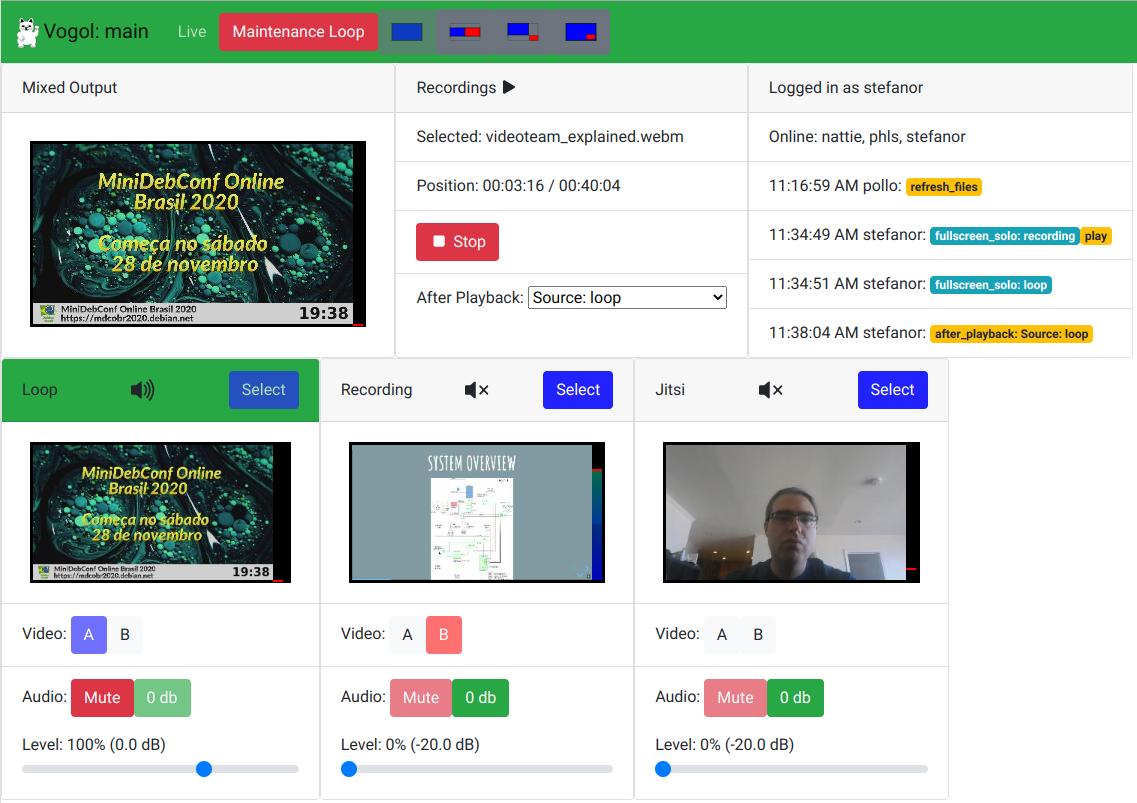
It comprises the following parts:
The maintenance loop:
The current status of the stream is indicated by the colour of the banner:
Green - stream is live
Red - the stream is showing the maintenance loop or is blank. Any changes made in sources or layout, below, will not affect the stream output.
The banner allows you to select between Live and Maintenance Loop for the current stream state.
The pre-recorded file selector:
DebConf encourages presenters to submit their pre-recorded talks to sReview. These are processed and can be played in the Recordings section of Vogol. The file must be loaded for play-out using the Select File button and then played it when appropriate. Pressing the Play button will automatically select the Recording source and start playing the file.
Once a recording begins playing, it cannot be paused, rewound, or fast forwarded. The Jitsi source should not be enabled for audio, either, because the presenters will be seeing the video with a delay and therefore can’t “talk over” the recording without going out of sync.
After pressing Play, set the After Playback drop-down to whatever is appropriate (e.g., Jitsi if there will be Q&A, or Loop if there’s nothing after the recording).
The Vogol video and audio sources:
When the stream is Live, audio and video from some of the sources below (Loop, Grabber, Recording, Jitsi, etc.) will be shown on the output.
Vogol provides four video layouts that you can select between in the banner. Video from either one or two sources will be shown. The selected video sources are A (blue) and B (red). You can set a source to be Source A or B by clicking on the appropriate button in the Video controls. This will be visible immediately on the stream, but won’t change the audio sources.
Audio sources are controlled by the Mute and 0 dB buttons and by the volume sliders. You can mute or un-mute the sound from a source with the buttons below. Un-muted sources have a Green title.
The “Select” button will make a source full-screen and un-muted, muting all other sources, in a single click. This is useful for switching to Jitsi at the start of a live talk and for switching to the Loop source at the end of a talk. However, for switching between Jitsi and Grabber during a talk, do not use “Select”, as that would mute Jitsi. Instead, use the “A” and “B” buttons on the individual sources.
The Jitsi and Grabber video sources:
You control the layout of the Jitsi video stream. You can switch the camera to the grid view or to an individual speaker. (This relies on the Everyone follows me setting described later.)
The Grabber source shows the desktop of the grabber box. The Talkmeister is logged on to that machine via VNC and keeps the desktop scrolled to what’s being talked about. The Director decides when to make grabber an (or the) active video source.
Recommendations
Press ? in Jitsi or Vogol to see their respective keyboard shortcuts.
During a talk, you should have the active source fullscreen (first layout), while the picture-in-picture (last layout) works well for the Q&A section of a talk with a Grabber.
During a BoF session, switch Jitsi to an individual speaker while they speak, but use the grid view to show people listening / nodding in agreement, or when there’s a quick exchange involving more than one person speaking.
You can switch the Jitsi camera effectively using the keyboard. W will
bring up the grid view. P will bring up a participants pane that will
be visible only to you. The pane will show who has their microphone unmuted
and can aid in switching the camera to a single speaker: pressing 0
will switch to the person at the top of the list (that’s you), pressing
1 will switch to the second person in the list, and so on.
You can open and use the Jitsi chat pane; it won’t be visible on the stream either.
Flow of a talk
A talk has the following flow:
Setup - Join the Jitsi room for the talk and start streaming from Jitsi (More Actions -> Start Live Streaming -> Enter Stream Key). Set Everyone follows me (More Actions -> Settings -> More -> Everyone follows me).
Introduction - Jitsi source fullscreen and unmuted with the Talkmeister in focus. Coordinate with the Talkmeister and speaker. Before switching to Jitsi, give them a count-down so they know when to start speaking.
Pre-recorded Talk - Recording source fullscreen with the Jitsi scene muted. Configure Vogol to jump to the desired layout (below) when playback ends. Give the Jitsi room a count-down before the talk ends in Vogol and the Jitsi room goes “on air”. (The talkmeister and speaker, even if they’re watching the stream, will be seeing it with a delay.)
Q&A
Use the Q&A Preset. This makes Grabber source A and Jitsi source B with one of the picture-in-picture layouts active. Jitsi unmuted.
In small events without a Grabber: The talkmeister should share the pad to Jitsi. Select Jitsi in Vogol.
You select what is active on the stream by clicking on users in the Jitsi call.
Loop - Set the stream back to loop.
Back in Jitsi, end streaming.
Running a talk (Talkmeister)
The Talkmeister is responsible for introducing the talk and handling the question-and-answer session with the speaker.
Before you start:
Arrive 5 minutes early for your talk, ensure that the director and speakers are ready.
The link for your talk’s Jitsi call is available from the individual talk page on the DebConf website, visible to the speaker and the volunteers working on the talk once they’re logged in.
Please do not give the Jitsi link to anyone not involved in the talk, as that effectively puts them “on stage” with you.
The Grabber source in Vogol (for events that have it) shows everything you see in VNC, so if the Grabber is selected, any changes made to the VNC viewer will be seen on the stream.
Before the talk:
Join the Jitsi room for the talk a few minutes before it starts, and coordinate with the speaker there.
It’s nice to introduce speakers. Tell the director that you want to introduce the speaker, and the director will tell you when to start speaking. Keep the introduction short.
During the talk:
Sit in the Jitsi room with the presenter. Jitsi will stop streaming if everybody is on mute for a long time, so talk to each other a bit.
Monitor IRC for questions, and collect them in the pad.
Edit the questions, if appropriate, and organise them into a logical order. You have editorial power, prioritise the questions you think are most important to get to.
At the end of the talk:
Lead the Q&A session, working from the pad.
Keep the pad in VNC scrolled to what’s being talked about.
Keep an eye on the time, and end the session on schedule.
Thank the speaker.
For events with the Grabber, you can open etherpad in the Grabber, and it will be available to the director as a source to mix in the video. It can be useful to show the questions to the pad audience in a BoF, or if there is a typed discussion the pad. See The VNC grabber. For events without the Grabber, you can share the pad from your own computer to Jitsi, see Screen sharing to Jitsi.
The VNC grabber
The Grabber machine is a desktop in the cloud that is screen-captured into the video mix. You can use this to display etherpad or gobby on the video stream.
Connect to the Grabber machine via VNC. The video team recommends TigerVNC as the VNC viewer:
$ sudo apt install tigervnc-viewer
$ cp /etc/ssl/certs/DST_Root_CA_X3.pem ~/.vnc/x509_ca.pem
$ xtigervncviewer -SecurityTypes X509Vnc <grabber_host_name>
The viewer will prompt you for the grabber password, and then give you access to the machine.
Open the Q&A pad for the talk. You may need to exit the fullscreen view of the previous pad using F11.
Increase the size to 190% so that it can be seen easily on stream.
Press F11 to go back to full screen.
If you are managing a BoF, and they are using Gobby, open Gobby on the Grabber (Applications -> Internet -> Gobby).
If you find the VNC viewer is slow or not updating your view of the grabber, you can start it with a compression level between 1 (little compression) and 6 (high compression):
$ xtigervncviewer -SecurityTypes X509Vnc -CompressLevel 5 <grabber_host_name>
Screen sharing to Jitsi
You can screen share from your browser to Jitsi. Chromium/Chrome can a full monitor, window, or even a browser tab. Firefox can only share a monitor or window.
For best results, resize the window that you will be sharing to around 1280x720, so that the text is readable on the stream, even for clients viewing the low resolution version.
When you share your screen, your camera will turn off. But you can turn it on again, by clicking the Start Camera button, and it will overlay in the bottom right corner of your shared screen.
Review video using SReview
Open review link provided by video team or in your email (for presenters)
Watch the video in the video player.
If it is correct, don’t change anything and hit the “Send your video review to …” button.
If it is not correct, select the “The video has problems” option, and enter the corrections necessary in the provided form (see below).
The video should start just before the presenter is introduced, or (in case there is no introduction) just before they start talking. If that is not the case, choose the correct option under the “Start time” header, and position the newly shown video element to where the video should start. Then hit the “Set new start time” button.
The video should end just after any “thank you” by the talkmeister, or applause by the audience (if any). If that is not the case, correct with the controls under the “End time” header, which work the same way as the “Start time” controls.
If there are audio issues, correct them with the audio controls: choose the correct channel, and/or enter an A/V sync correction value.
After entering all correction values, hit the “Send your video review to …” button. The system will prepare another review, which you will then need to re-review.
If there are problems that cannot be fixed using the web form, there are two options:
In case the problem cannot be fixed but is not fatal (e.g., an annoying audio hum that does not make the video unusable), an apology slide can be added to the video just after the title slide.
In case of a problem that makes the video useless, the video should not be released.
You can either use the “other brokenness” option in the web form to signal these problems, or just talk to the video team.
Subtitles are done manually for DebConf: https://wiki.debian.org/Teams/DebConf/Video/Subtitles
Troubleshooting
General
Keep an eye on the IRC to track and respond to any potential problems.
Keep the streaming key copied or close at hand in case the live stream drops, to enter it fast.
Before the talk:
Make sure the session host and speaker are in the Jitsi room (via IRC for example)
Confirm that the file is loaded into the file player section of Vogol.
Talk start:
If you press the wrong button while directing, you can correct it by applying the action you intended to perform afterwards. For example, if you switch to the wrong source, you can switch back to the correct one by clicking on the appropriate Select button
Don’t be afraid to tell the audience that there is a problem that you are working on. It’s better than having them frustrated and not sure what is going on.
You hear ‘the live stream has stopped’ when you are pretty sure it should not. Inform the speaker to wait, try start it again. If it keeps dropping, inform the video team to try find a work around.
Jitsi
Test Jitsi with a few people in a call. If it doesn’t work, try these options. From best to worst quality:
Use current Chrome, Chromium or Firefox.
Press More Actions -> Manage Video Quality to manage call quality, Try Low, or even Audio Only.
Turn off Outgoing Video.
Try a second device (Phone or tablet).
If that’s also having connection problems, try the cellular network, rather than WiFi.
Dial into Jitsi over the phone network. If you click on the “invite people” button in the bottom right corner, Jitsi will display the dial in number and PIN.